
Google Cloud Platform created the Vertex AI as the unified platform to build and deploy machine learning models. It enables a widely discussed MLOps approach that improves modelling by using DevOps and data engineering methods. Wouldn’t it be an ideal situation if you could integrate Vertex AI with Snowflake?
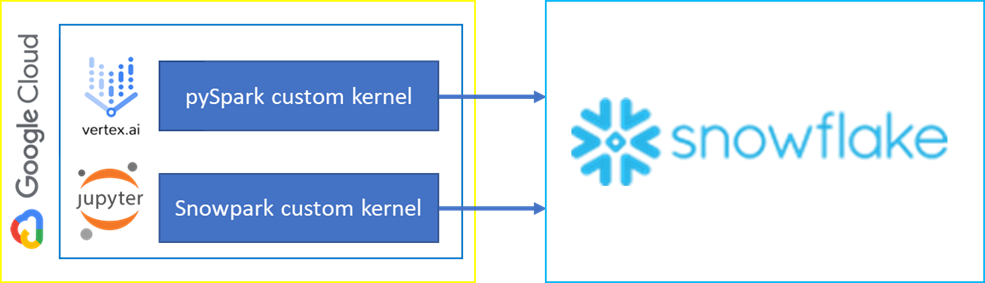
We prepared custom Jupyter kernels that can be imported into Vertex AI offering duo connection options:
- Snowflake Connector for pySpark
- Snowpark
Let’s look closer at what they offer, and which one would be more compatible for your needs (perhaps both?).
Preparing custom Jupyter kernel for Vertex AI
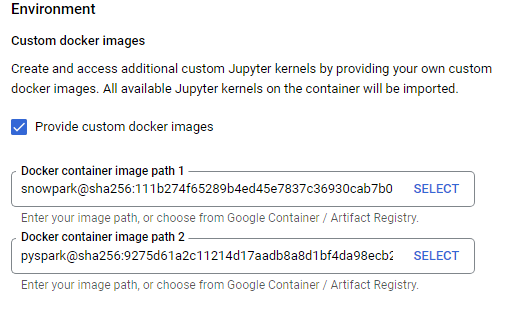
Both pySpark and Snowpark are not directly available in the current Vertex AI implementation. Hence, we need to create custom docker images that will be imported as the additional kernels in the JupyterLab offered by the Vertex AI. Firstly, we create a Dockerfile for each image. Custom images must be based on one of the base images described in the documentation: https://cloud.google.com/deep-learning-containers/docs/choosing-container. In our case, base-cpu is enough.
- Example Dockerfile for pySpark
FROM gcr.io/deeplearning-platform-release/base-cpu

RUN conda install -y openjdk==8.0.332
RUN pip install pyspark==3.2.2

ARG KERNEL_CFG=/opt/conda/share/jupyter/kernels/python3/kernel.json
RUN jq '. += {"env":{"JAVA_HOME":"/opt/conda/"}}' $KERNEL_CFG > new_kernel.json && mv new_kernel.json $KERNEL_CFG
Explanation:
- install OpenJDK and pySpark in compatible versions (since Spark uses JVM under the hood)
- add JAVA_HOME environment variable for the default Jupyter kernel defined in the base image
- Example Dockerfile for Snowpark
FROM gcr.io/deeplearning-platform-release/base-cpu


RUN jupyter kernelspec uninstall -y python3
RUN conda create --name snowpark -y python=3.8
SHELL ["conda", "run", "-n", "snowpark", "/bin/bash", "-c"]


RUN pip install jupyter ipython snowflake-snowpark-python

RUN ipython kernel install --name "snowpark"
Explanation:
- Uninstall existing Jupyter kernel based on Python 3.7 (Snowpark requires Python 3.8)
- Create a new Anaconda environment based on Python 3.8
- Log into the new environment
- Install additional tools including Snowpark library
- Install the new environment as Jupyter kernel
If necessary, you can pre-install any other Python package frequently used in your notebooks, so you do not need to install it manually later.
Having ready Dockerfile, we can build the docker image.
docker build -t image-name:latest
Then we should tag and push the image to the Google Artifact Registry. Set up the repository according to the documentation: https://cloud.google.com/artifact-registry/docs/docker/store-docker-container-images.
docker tag image-name:latest my-region-docker.pkg.dev/my-project-id/my-repo-id/image-name:latest

docker push my-region-docker.pkg.dev/my-project-id/my-repo-id/image-name:latest
Now the image is ready to be used in Vertex AI. You can add it when creating Vertex AI notebook in Advanced settings -> Environment. Multiple custom images, for example Snowpark and pySpark can be used in a single notebook.
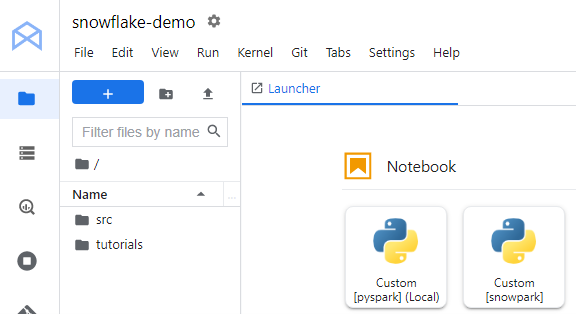
Finally, if you open JupyterLab in the newly created notebook, you should see the custom images available as kernels.
At this stage we are ready to start exploring the possibilities of both connectors. Some of them are presented in the following sections.
Snowflake Connector for pySpark
Imagine you have developed a lot of analytical pipelines using pySpark that sources data from Hadoop or from any relational database. Then, at same point your company decided to migrate all or part of your sources to Snowflake. Moreover, you are additionally asked to move your pipelines from on-premises infrastructure to the cloud.
Snowflake Connector for pySpark makes it possible to migrate your code with minimal effort. You are still using the same pySpark API, only data sourcing/writing functions need to be slightly modified to use Snowflake instead of the previous data source. Vertex AI offers easy to set up cloud platform to run your Jupyter notebooks. You have everything you need to start the migration.
Let us explain how to use the connector for an analytical task. Imagine you want to estimate a location knowing only its distances from another set of points – the problem is known as a multilateration. The below map (created in geojson.io website) visualizes our goal – the grey circles show the known distances from the searched point. The red mark with the green circle is the estimation result with an error.
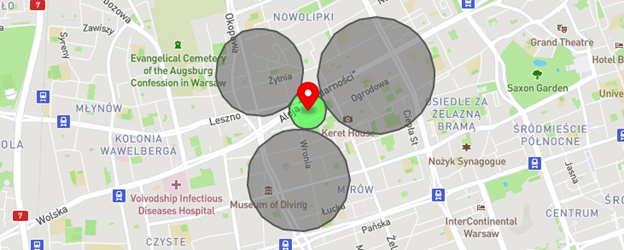
Note that the number of input points does not have to equal 3. The more points, the more accurate estimation the algorithm should deliver.
Let’s define our minimalistic input data from the above map in Snowflake:
 create or replace table multilateration_input(
  locations array,--[ [lat1, lon1], [lat2, lon2], ... ]
  distances array --[ dist1, dist2, ...]
);

 insert into multilateration_input
select [ [52.24068352228324, 20.980206614355717], [52.24047328952902, 20.991927302222052], [52.23403442903563, 20.984116709570376] ], [0.3,0.4,0.35]
;
Locations column contains the input points coordinates while distances columns includes their distances to the searched location.
Then, let’s move to the Vertex AI notebook with pySpark kernel. Define pySpark session with Snowflake connector dependencies, Snowflake connection details and helper functions are responsible for reading/writing dataframes from/into Snowflake.
# pySpark session with Snowflake dependencies

spark = SparkSession \
    .builder \
    .appName("DemoApp") \
    .config('spark.jars.packages',
            'net.snowflake:spark-snowflake_2.12:2.10.0-spark_3.2,' +
            'net.snowflake:snowflake-jdbc:3.13.14'
           ) \

    .getOrCreate()

# Snowflake connection details read from environment variables
sfOptions = {
  'sfURL': os.environ['snowflake_account'] + '.snowflakecomputing.com',
  'sfUser': os.environ['snowflake_user'],
  'sfPassword': os.environ['snowflake_password'],
  'sfDatabase': os.environ['snowflake_database'],
  'sfSchema': os.environ['snowflake_schema'],
  'sfWarehouse': os.environ['snowflake_warehouse']
}

SNOWFLAKE_SOURCE_NAME = 'net.snowflake.spark.snowflake'

# Reading dataframe from Snowflake
def get_snowflake_table(table_name: str) -> DataFrame:
    return spark.read.format(SNOWFLAKE_SOURCE_NAME) \
        .options(**sfOptions) \
        .option('dbtable', table_name) \
        .load()

# Writing dataframe into Snowflake
def store_df_in_snowflake(df: DataFrame, table_name: str, save_mode: str):
    df.write \
        .format(SNOWFLAKE_SOURCE_NAME) \
        .options(**sfOptions) \
        .option('dbtable', table_name) \
        .mode(save_mode) \
        .save()
Now we are easily able to read Snowflake table as pySpark dataframe:
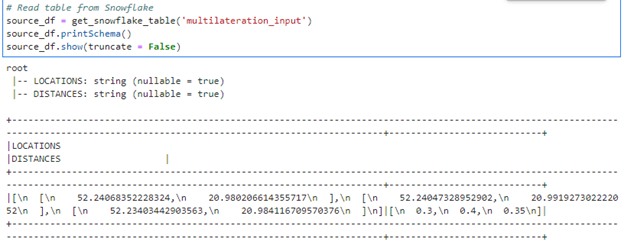
Array columns were converted to strings – this is the expected behavior described in the documentation: https://docs.snowflake.com/en/user-guide/spark-connector-use.html#from-snowflake-to-spark-sql. Remember to parse them back to arrays if needed.
In the next step, let’s define the main function returning the estimated location:
def estimate_location(locations: str, distances: str) -> dict:
    locationsList = json.loads(locations)
    distancesList = json.loads(distances)
    … estimation logic
    return {"point": ESTIMATED_POINT, "rmse": ESTIMATION_ERROR}

multilateration_udf = udf(estimate_location, MapType(StringType(),StringType()))
At the beginning we parse back the strings with locations and distances as per the lists. We are not focusing on specific algorithm implementations – as there are many sources covering this subject in details, for example: https://www.alanzucconi.com/2017/03/13/positioning-and-trilateration/. At the end the function returns dictionary with two values: estimated point and estimation error.
The function is further used to construct pySpark user-defined fuction (UDF) that is finally used to run and return the estimation. The result is added as a new column in the output dataframe:
multilateration_udf = udf(estimate_location, MapType(StringType(), StringType()))
output_df = source_df.withColumn('result', multilateration_udf('locations', 'distances'))
output_df.select('result').show(truncate = False)

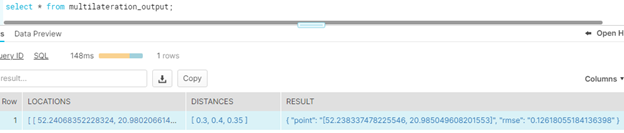
Finally, the output data frame can be written in Snowflake using provided helper function:
store_df_in_snowflake(output_df, 'multilateration_output', 'overwrite')
Snowpark
You can also consider implementing/migrating some of your analytical workload using Snowpark instead of pySpark. The advantages of this approach:
- enables running your UDF-s 100% in Snowflake environment. It can boost the performance of your pipelines since there is no need to transfer all the data from Snowflake to pySpark environment and vice -versa
- Snowflake usually scales easier than a typical Hadoop cluster running pySpark jobs (not even mentioning a single Vertex AI instance)
- Snowpark UDF-s can be accessed from Snowflake SQL and shared with other users as all “standard” user-defined functions
Having developed pySpark UDF, moving it to Snowpark is pretty straightforward. Firstly, we create the Snowpark session instead of pySparkSession:
# Creates Snowpark session, connection details read from environment variables
def create_session_object():
    connection_parameters = {
        "account": os.environ["snowflake_account"],
        "user": os.environ["snowflake_user"],
        "password": os.environ["snowflake_password"],
        "role": os.environ["snowflake_role"],
        "warehouse": os.environ["snowflake_warehouse"],
        "database": os.environ["snowflake_database"],
        "schema": os.environ["snowflake_schema"]
    }

    return Session.builder.configs(connection_parameters).create()
Then we can create Snowpark UDF using almost the same function as we created for pySpark job. The only difference is that you do not need to convert locations and distances from strings to lists since Snowpark supports the array data type. Since the UDF is run in Snowflake environments, you only need to provide all non-standard libraries as packages loaded from the Anaconda Snowflake channel – for example you need to provide scipy optimization library when used in an estimation algorithm.
session = create_session_object()

def estimate_location(locations: list, distances: list) -> dict:
    … estimation logic
    return {"point": ESTIMATED_POINT, "rmse": ESTIMATION_ERROR}


@udf(name="multilateration_estimate", is_permanent=True, stage_location="@SNOWPARK_UDFS", replace=True, packages=["scipy"])
def multilateration_estimate(locations: list, distances: list) -> dict:
    return estimate_location(locations, distances)

session.close()
We created a permanent UDF that needs to be stored in a stage and therefore can be accessed directly from SQL as any other custom defined function:
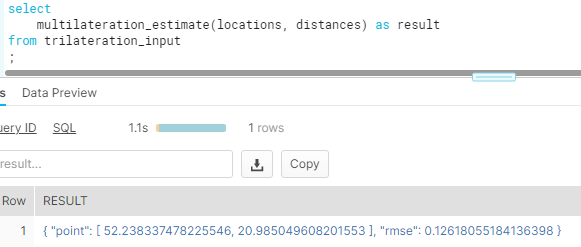
The result contains of course the same result as obtained using pySpark. We encourage you to check and compare these two approaches and kindly give us the feedback how they behave within your actual environment.
Thanks for reading.